


Tuber Tutorial
A dahlia tuber is the below-ground portion of the plant.
It’s a starchy storage organ that holds the meals, vitamins, and water wanted for progress because the plant establishes feeder roots.
They arrive in a wide range of shapes. Some look distinctly yam-like, others could be lengthy and skinny, plump and rounded, or elongated teardrops, relying on the variability.
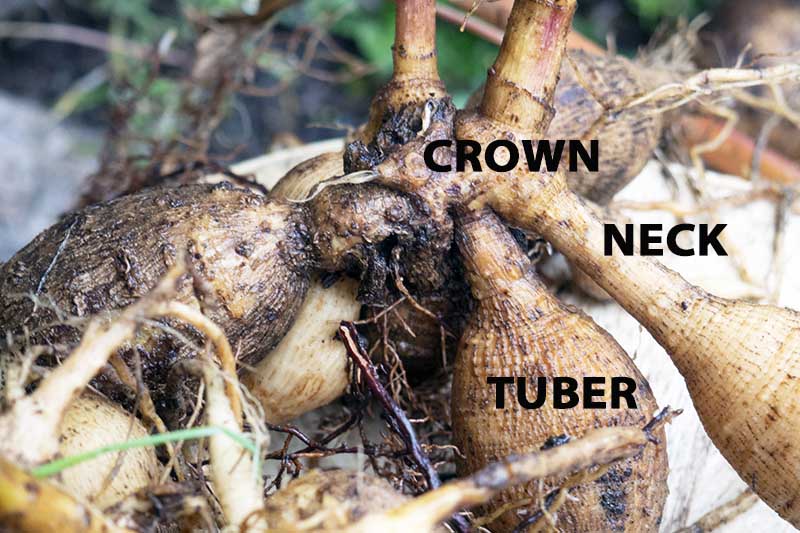
For the needs of storage and division, there are three sections to concentrate on:
- The fleshy crown positioned on the base of the stem.
- The skinny neck that attaches the tuber to the crown.
- The massive tuber that’s hooked up to the crown by the neck.
The crown is barely the one a part of the plant that develops progress eyes.
However for profitable propagation, all three sections are required to stay intact.
For that reason, don’t attempt to propagate new crops utilizing tubers which have grown from others – with no piece of crown, new crops received’t develop.
Additionally, do you have to inadvertently break off actively rising eyes, it’s not an issue. New ones will push up from the crown on the similar location.
Dig and Raise
When first lifted, dahlia tubers can have fragile necks.
If attainable, dig them out within the morning and permit them to take a seat on the bottom for just a few hours earlier than cleansing and dividing – the necks will likely be much less brittle and simpler to deal with.

To take away a clump, reduce down stems to roughly 12 inches from the bottom, for those who haven’t executed this upfront.
Mark a radius of roughly 12 inches across the clump and use a backyard shovel or fork to dig down six to eight inches to loosen the soil.
When the soil is unfastened, insert your fork underneath the clump and carry it fastidiously. Grasp the flower stems that will help you carry it if wanted.
Gently knock off any massive lumps of soil from the clump and rinse with a backyard hose to take away any remaining grime.
With a pointy, clear knife, reduce away any items which are broken, discolored, delicate, or rotting.

Invert the clump and set it the wrong way up in a dry location for just a few days. This enables any stem water to empty away and helps to take away extra moisture from the tubers.
This time spent drying, or curing, is essential to forestall contamination from micro organism, fungus, mildew, and winter rot which may injury or destroy your tubers.
After the pores and skin begins to wrinkle barely, the tubers are dry sufficient for storage.
Winter Storage
Storing tubers is easy and all kinds of containers can be utilized together with cardboard or wood containers, paper baggage, or styrofoam ice chests.
Your dahlia tubers shouldn’t be saved in plastic bins, containers, or baggage as these are inclined to entice an excessive amount of moisture which may simply result in mildew and decay.

They may require a dry to evenly moist packing medium. Coconut coir, peat moss, perlite, sand, sawdust, or vermiculite all work effectively for packing tubers.
For storage, line the field backside with a number of layers of newsprint then add a beneficiant layer of your chosen packing medium – two to a few inches deep.
With clear, sharp backyard shears, take away any lengthy feeder roots rising from the tuber and any remaining items of stem.
Mud the tubers with a fungicide powder corresponding to backyard sulphur earlier than storing, and make sure you apply it to any reduce surfaces as effectively.
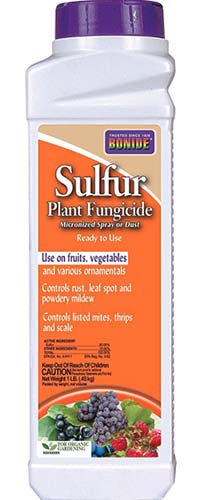
Bonide Sulfur Plant Fungicide
Backyard sulphur could be bought on-line at Arbico Organics.
Place clumps of tubers contained in the field on prime of the packing medium making certain that they’re not touching. Add extra packing materials on prime till they’re fully lined.
Shut the field and retailer it in a cool, darkish location corresponding to a basement, cellar, storage, or shed.
To make sure viability, temperatures want to stay above freezing and beneath 50°F, with a perfect temperature vary of 40 to 45°F.
Each month, examine the tubers fastidiously and discard any that present indicators of softness or rot.
In late winter or early spring, transfer your containers to a heat (60 to 70°F), darkish location.
Each week, sprinkle a tablespoon of water on prime of the packing medium till you might be able to plant them out.
The heat and added moisture assist the expansion eyes to develop, which makes division simpler.
Divide and Plant
In any case danger of frost has handed, when you find yourself able to plant, take away the clumps from storage and gently shake off the storage medium.
Examine the clump and discard any tubers which are moldy, delicate, or rotten in addition to these with damaged or broken necks.